
Chocolate Mint Brownies
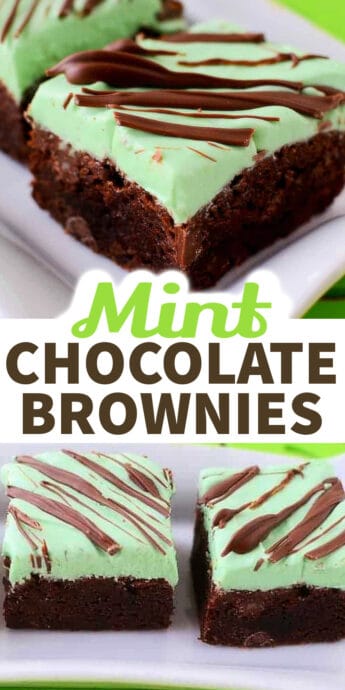
This easy Chocolate Mint Brownies dessert recipe has it all – the classic look, taste, and is so very simple to make thanks to using a brownie cake mix. These rich and fudgy brownies are topped with a creamy mint frosting.
I usually bake the most right before a holiday, and St. Patrick’s Day is my all-time favourite holiday to bake for, both for the kids and friends. These Baileys Chocolate Cookies are truly a must-make recipe. Another great one is this Mint Chocolate Cheesecake Cookie Dip – DIVINE!!
This year I wanted to try another festive recipe for St. Patrick’s Day. Who can resist a brownie topped with mint buttercream? I know I can’t say no to this delicious brownie recipe.
This brownie dessert has it all – the classic look, taste, and the simplicity thanks to using a brownie box mix. Boxed brownie mix is a fabulous shortcut for great results, just like for our Smores Brownie Pie Recipe. Chocolate lovers rejoice!
This chocolate mint brownies recipe is a simple and easy recipe like our Chocolate Mint Cookie Cups. The mint flavor isn’t too much which is great for both kid and adult themed st. patrick’s day parties and potlucks.
Why You’ll Love This Recipe
- Total Time: 20 Minutes
- Serves: 8
Ingredients and Notes
As always, the full ingredients and recipe is on the printable recipe card at the end of this post.
Recipe Substitutions
Tips for Success
How to Make Mint Chocolate Brownies
- Bake brownies according to the box directions using a large bowl for the brownie batter, and a square pan. When cooked, remove baking pan from the oven and let completely cool on a wire rack, to room temperature.
- To prepare icing, begin by beating the melted butter and 1 cup of powdered sugar together. Slowly add the remaining cups. The icing should be stiff, so add the mint extract first, the green food coloring and then the cream in ½ tablespoon increments until the desired consistency is reached. You can do this with a hand mixer, electric mixer or a stand mixer with the paddle attachment.
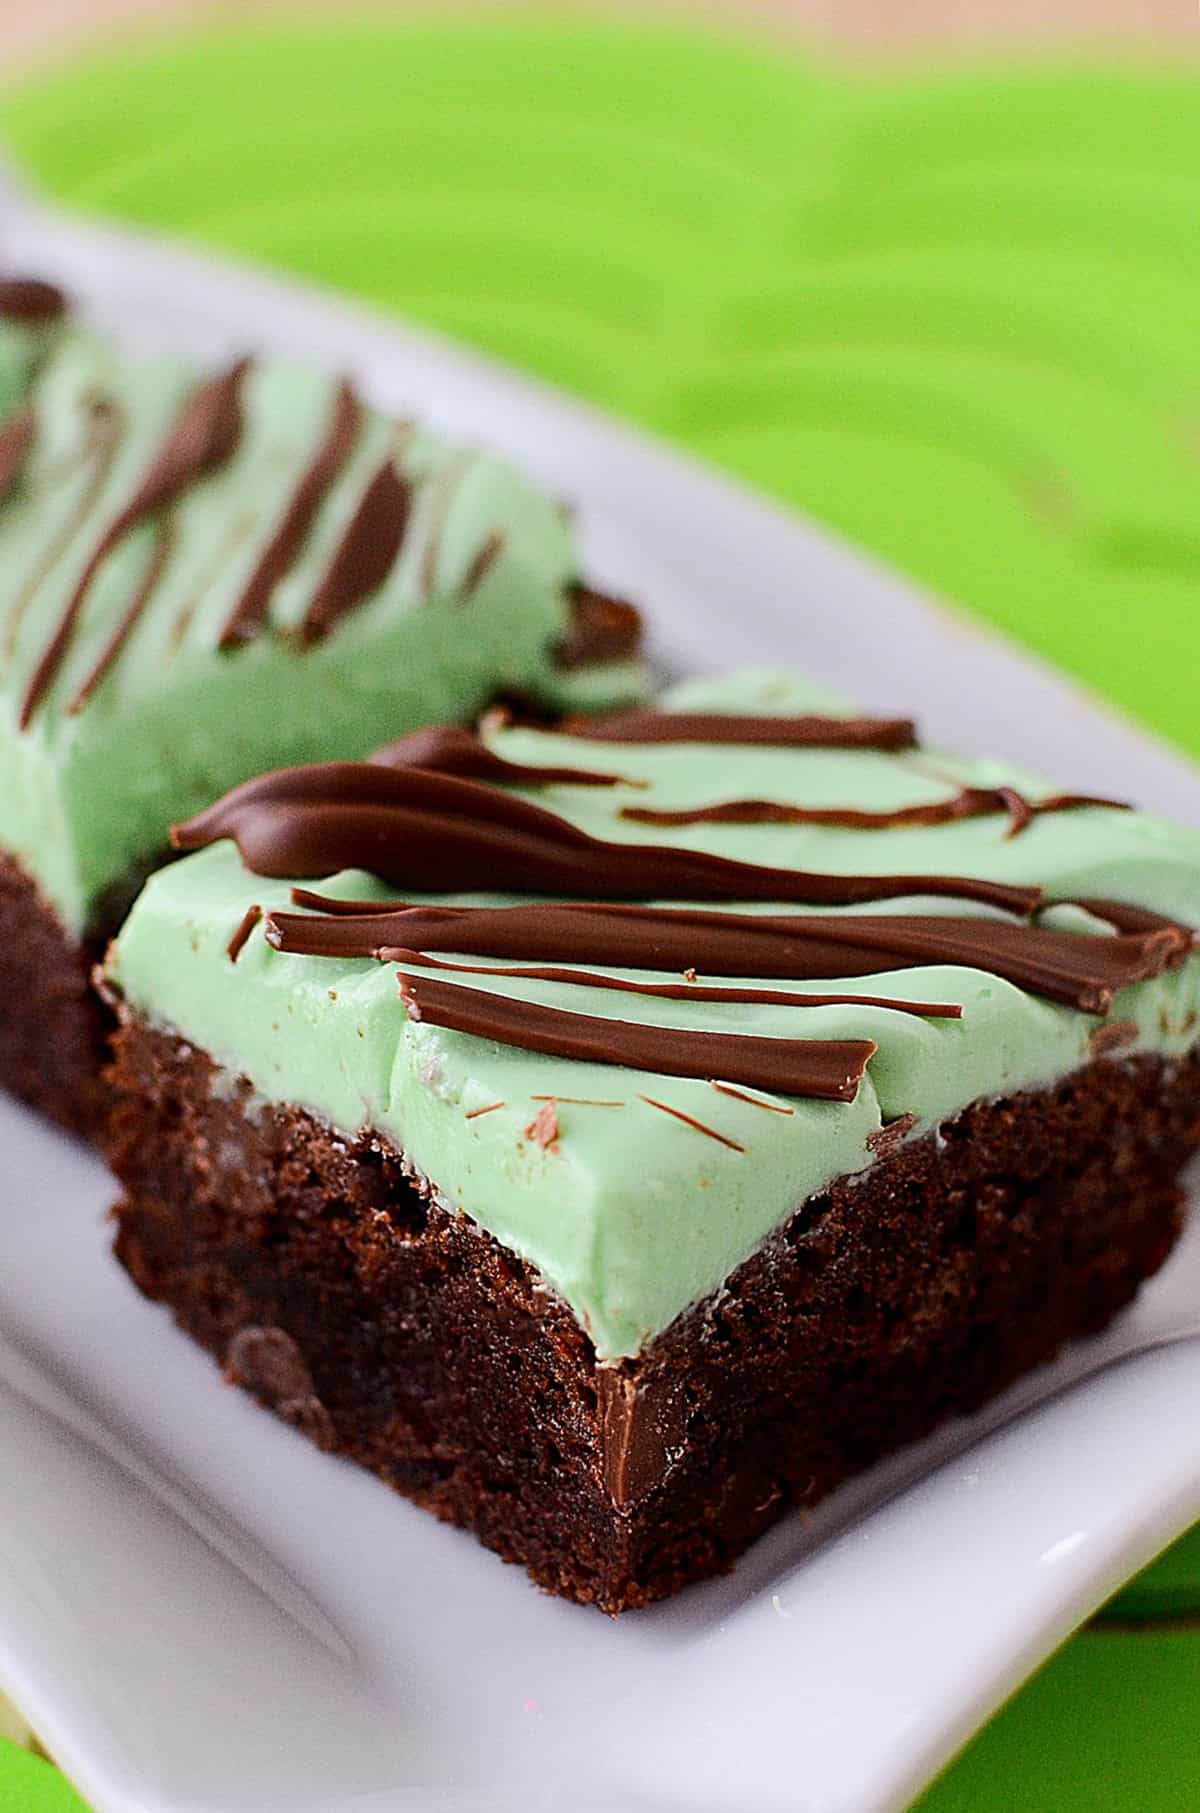
- Ice the cooled fudgy brownie base with the creamy mint frosting, smooth out the top using an offset spatula. Freeze for 2 hours to set. Remove the brownies from the freezer.
- Remove the brownies from the freezer. Place the milk chocolate chips in a small bowl (microwave safe bowl) and microwave in short 15 second increments until melted, do not overcook. Drizzle the melted chocolate glaze over the top. When it’s hardened, cut the brownies in serving sizes using a sharp knife, finish thawing the rest of the way and serve.
Note: Freezing the brownies after they are iced is only for nice clean cut marks when you cut the brownies. If this doesn’t bother you, then you can skip the freezing portion and go straight to drizzling the chocolate and serving.
Serving Suggestions
You can enjoy these mint chocolate brownies as a sweet treat, snack or dessert. Our favorite brownie recipes are great alone or served over top of ice cream.

Storing and Freezing
Place these perfect mint brownies in an airtight container or cover with plastic wrap or aluminum foil – and refrigerate for up to 5 days.
Freeze chocolate mint brownies for up to 3 months when properly wrapped and stored to prevent freezer burn.
Enjoy this wonderful Chocolate mint brownies box mix recipe without corn syrup. Also known as grasshopper brownies, these are worthy of being made and loved.
Recipe FAQ
Yes, you can. As well, you can add vanilla extract as well.
Yes, you can freeze chocolate mint brownies for up to 3 months. Just make sure to wrap and store properly to prevent freezer burn.
More Brownie Recipes
If you’ve tried this Best Mint Brownie Recipe or any other recipe on my blog please let me know how it went in the comments below. I love hearing from you. Finally, consider leaving a 🌟 star rating while you’re here. Thanks!
Chocolate Mint Brownies
Ingredients
- 1 brownie cake mix
- ½ cup chocolate chips
FOR THE ICING
- 3 cups icing sugar
- ½ cup butter
- 2 tbsp cream
- ¼ – ½ tsp mint extract
- 5 drops Green food colouring
FOR THE DRIZZLE
- 1/3 cup milk chocolate chips (melted)
Instructions
- Prepare brownies according to the box directions and let completely cool to room temperature.
- To prepare icing, begin by beating the butter and 1 cup of sugar together. Slowly add the remaining cups. The icing should be stiff, so add the mint extract first, the food coloring and then the cream in ½ tablespoon increments until the desired consistency is reached.
- Ice the cooled brownies with the creamy mint frosting, smooth out the top using an offset spatula. Freeze for 2 hours to set. Remove the brownies from the freezer.
- Remove the brownies from the freezer. Place the milk chocolate chips ina small bowl and microwave in short 15 second increments until melted, do not overcook. Drizzle the melted chocolate glaze over the top. When it’s hardened, cut the brownies in serving sizes using a sharp knife, finish thawing the rest of the way and serve.
Notes
- Place brownies in an airtight container or cover with plastic wrap or aluminum foil – and refrigerate for up to 5 days.
- Freeze chocolate mint brownies for up to 3 months when properly wrapped and stored to prevent freezer burn.


Actually I tried adding about a teaspoon of coconut oil and was able to drizzle it on.
I haven’t tasted the brownies yet but just wanted to comment that I baked them in a 9×13 pan and didn’t have enough frosting to cover, definitely not a thick layer as yours show in the pics. Next time I will make an extra half recipe.
Hmm, I’d have to measure my pans, but I recall this being made in one of my smaller square pans. 8×8 or maybe 9×9?
I just wanted you to know how much we love these brownies. My family loves all things chocolate & mint which means I am always looking for new desserts to satisfy their cravings. I have tried many chocolate mint brownies but yours is my favorite. It works every time and the ingredients are basic. So many recipes for brownies like these can get very expensive and time-consuming but the end result is disappointing. Thank you so much for posting this!
3/17/18
I made these yesterday and they were a hit. I used a mini cake pan from pampered chef. Yummy